Tuesday, June 29, 2010
Last Trip to VEGAS!
So all last week I was in VEGAS! For a wedding on my wife's side of the family. Wow bring your bank roll you'll need it, everything's expensive. The things I enjoyed the most were free. Fountains at the Bleigo (? Spell) and the Hoover Dam, we also attended an awesome 80s cover band in our hotel. There was a HP convention happening with NERDS everywhere. All in all it was a good trip with everyone surviving without killing one another. However, I was SOOOOOO glad to LEAVE. I wont be going back to VEGAS for a VERRY LONG TIME!
Wednesday, April 14, 2010
Dumpster DELL - Assemble!
I assemble the Dumpster DELL with parts from my old machine, MONOLITH. I talk about and show the entire assembly, including important steps. Everything is squeezed in under three minutes! Take a new look at this former piece of someones Junk in the "VLOG".
Tuesday, April 6, 2010
The DUMPSTER DELL Project
My Latest find is a DELL Dimension 2400, I found at the dump. I have already removed all the dead components. Being that this is one of my favorite OEM computer cases I thought this would be a good time to make a video showing why I like to use this case in my computer rebuilds or retro fits. During the video, I forgot to mention that most, computers that you find will still have a Windows CD Key Sticker that you can use for your operating system. This will save you about $150+ dollars for the Case, Operating system and shipping. Ill let my first VLOG speak for itself!
Tuesday, March 30, 2010
Bending Up Your Sinks
OK her's where you can really make some changes. After you remove the old crappy compound from the bottom of the sink, You can carefully bend the fins to increase the air space between them. This will increase the air flow and provide more air around the fins to dispense heat into.
You'll want to use a long piece of metal such as flat head screwdriver, or steel bracket. start on the far end and bend the fin outwards to at least a 45 degree angle. Then bend the next fin until its at a slightly less angle 42 degrees give or take, depending on the sink.
You'll want to use a long piece of metal such as flat head screwdriver, or steel bracket. start on the far end and bend the fin outwards to at least a 45 degree angle. Then bend the next fin until its at a slightly less angle 42 degrees give or take, depending on the sink.
DO NOT bend the sinks base, or you will ruin it.
(For most sinks this will not be a problem)
(For most sinks this will not be a problem)
A picture is worth a thousand words. And here is another sink with the fins bent out in both directions.


After you have all the fins spread out, simply reapply your Arctic Silver Compound and carefully place the chip back on to the board.
 And here is another sink with the fins bent out in both directions.

After you have all the fins spread out, simply reapply your Arctic Silver Compound and carefully place the chip back on to the board.
Adding a fan & Heat sink stuff

Well there's not much to say here, adding air flow around a heat sink will keep it MUCH cooler.
You can mount the fan near the sink, on the sink, blowing or pulling air through the sink the more air flow the cooler. Also remember that more air flow means more noise and more dust flow. I recommend medium speed fans or a stylish fan speed controller.

And you can remove the sink from the board and remove the heat sink compound. Then replace it with Arctic Silver. This is very effective on older system where the compound has dried up.

3 steps
There are three ways we can increase a heat sinks efficiency.

1. Increase Air Flow (Add a fan)
2. Replace Heat Sink Compound
3. Bend the snot out of your heat sink.
Keep Reading for step one.

1. Increase Air Flow (Add a fan)
2. Replace Heat Sink Compound
3. Bend the snot out of your heat sink.
Keep Reading for step one.
Friday, March 26, 2010
Heat Sink Mod

Make your stock heat sinks more effective.
I love heat sinks and heat transfer. Yeah that's right.
When I first learned that within electronics, when you need to cool a hot component you apply a metal piece with radiator fins and a fan blowing through it, I thought that it was the coolest thing I have ever seen. Even though now days it is commonplace.
Most manufactures use passive heat sinks that have no fan. The easiest way to quickly cool them is to add a fan on top or near the sink witch blows air through the fins cooling the sink. However, what if you cant add a fan easily. You could replace it with a larger or taller on. but who wants to spend extra money and wait for it to arrive? Here is the easiest way to increase the efficiency of a stock heat sink.
Aggressive Electronics Dispersal

So I was at work the other day and I peered inside the box of dead computer parts. And had a epiphany, Its a good time to go to the range. My wife, friend Chris and I gathered at the local open firing range. Chris brought the guns , all in all we had a .22 target pistol, a 45, and a 5 shot 357. I brought some full soda cans to sacrifice along with the hard drives and power supplies. It was my wife's first time shooting a pistol, she was nervous but did fine.
As it turns out a .22 will mist a soda can and will easily penetrate a power supply however has difficulty getting through all the components inside. The 45FMJ will go right through it with no real issues, However a hard drive will stop a 45FMJ before going strait through. Now on the other hand a 357 will have no problem going through everything! Soda, Power supplies and hard drives ; D And will also just about break your hand while firing it.

We shot off a total of 51 rounds before the wind came up and we froze our butts off at 24F. Even the soda in the cans was freezing. We left in a hurry to get warm again. I didn't get pictures at the range but have a GREAT image of a drive with a 45 round in it. All in all we have a great time shooting and will go again as soon as the weather warms up.
 Here is a .22 that didn't quite make it through a heat sink inside one of the power supply s.
Saturday, March 20, 2010
It's SHOWTIME!
After checking all your electrical connections, Fire  up your projector. Make any adjustments to the bulb placement if needed after the bulb has cooled. I can get a massive 12 Foot screen using this mod. Its much brighter than the automotive light I used last time.
Invite your friends over to the movies and show them the projector you modded.
Pop popcorn and through in one of your favorite movies.
Please check out my other projects:
Automotive Head Light Projector Mod
Upgrade from VISTA to XP
More Audio/Video
CAUTION : This Halogen bulb is HOTTER that the automotive headlight that was used last time.
You will need a significant amount of air flow through the bulb chamber to cool the bulb and NOT START A FIRE! Also, keep the bulbs power cord unplugged, you don't want someone turning on the bulb with out the fan. I am not held responsible for damages due to improper use of your projector.
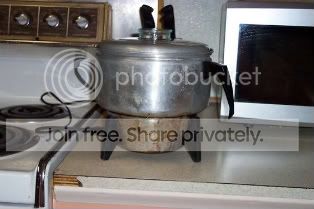
 My next project how to make perfect popcorn!
This popcorn popper makes great popcorn. Legend has it it was discovered abandoned in a work camp on the Alaskan pipeline.
 up your projector. Make any adjustments to the bulb placement if needed after the bulb has cooled. I can get a massive 12 Foot screen using this mod. Its much brighter than the automotive light I used last time.
Invite your friends over to the movies and show them the projector you modded.
Pop popcorn and through in one of your favorite movies.
Please check out my other projects:
Automotive Head Light Projector Mod
Upgrade from VISTA to XP
More Audio/Video
CAUTION : This Halogen bulb is HOTTER that the automotive headlight that was used last time.
You will need a significant amount of air flow through the bulb chamber to cool the bulb and NOT START A FIRE! Also, keep the bulbs power cord unplugged, you don't want someone turning on the bulb with out the fan. I am not held responsible for damages due to improper use of your projector.
 My next project how to make perfect popcorn!
This popcorn popper makes great popcorn. Legend has it it was discovered abandoned in a work camp on the Alaskan pipeline.
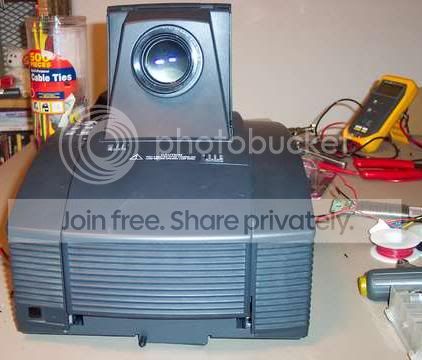
Insert the bulb and reassemble the projector.
Place the bulb in the bulb socket and place it directly where your original bulb would be or your automotive head light was if you completed my previous mod. The position is critical, the bulb must be aligned with the reflector and lens or the image will have darkened areas.

Wire the switch and the bulb socket.
Wire the switch, power cord and bulb socket. You should
 know that in building wiring Black = Hot, White = Neutral, and Green = Ground.
Wire the switch through the hot wire, and the bulb socket white to white and black to the switch. You can ground the Green to the ground on your projector.
If you don't know electrical wiring I suggest getting a friend to help with this project.
Mounting the switch
Carefully drill a hole in your projector casing. Find the best place where you have room for the switch, wire and nuts underneath. Or use a small project box out side the projector. if you have no room.
On my projector about 2 inches from the bulb socket worked well.
Unscrew the red switch and mount it in the casing. (See picture)
On my projector about 2 inches from the bulb socket worked well.
Unscrew the red switch and mount it in the casing. (See picture)

Friday, March 19, 2010
Taking things apart : )

Now that we have the work light take it apart!
The nice thing about the work light is that it contains all the things we need to build this mod. A halogen bulb, a bulb socket, switch, and a power cord. The only thing you need are tools (a screwdriver, pliers, drill & bits) and wire nuts.

Disassembly is easy, as the light comes only partially assembled. All screws used a Phillips driver, and to remove the clear wire nut crimps just pinch them on the sides with some pliers.
There are four parts we will need. The Halogen Bulb, the Bulb socket, switch, and power cord.
Put the light casing back in the box for your next project.
Obtaining the Work Light
Step 1: Go to HOME DEPOT

In their Electrical Section you will find a small ~$10 250 Watt Halogen Work Light
Make sure that the bulb is 3.15 inches NOT a 4.69 inch or it may not fit.
You will want to measure the space that you have in your projector before
 going to the store.
You can get 3.15 inch bulbs that go from 75 to 400 watts in 3.15 inch. However, remember that even though more watts means more lumens, it also means more heat.
(We don't want to melt the projector or start a fire)
Once you have found the bulb that will fit your projector, Buy it and continue to step 2.
Halogen Work Light Projector Mod
Halogen Work Light Projector Mod V2.0
A Home Theater that won't brake the bank.
Simply use a burnt out projector and a Work Light from Home Depot and bring the theater home!
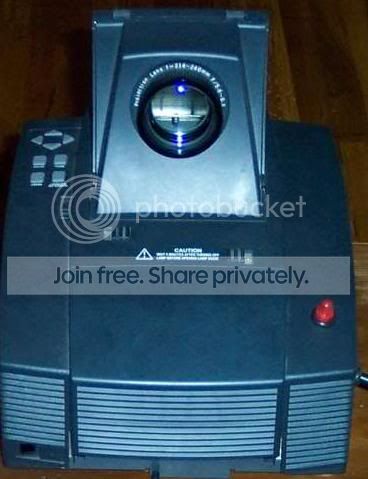 The OEM replacement bulb for my projector cost $300 !!! , more than what I paid for the projector it self. Also, my power supply that powered the original bulb was almost toast. Using this guide, you can use a Halogen Work Light bulb for about $10 dollars.
If you like this mod please Digg It!
This project is a redo of my Automotive Head Light Projector Mod
WARNING : This mod involves modification of a projector, electrical wires, switches and a high power bulb. If you are not comfortable with modding on this level, DO NOT attempt this mod. The writer is not responsible for any injuries or damages resulting from these instructions.
Wednesday, March 17, 2010
Lights, Projector, ACTION!
Close the lid and fire up the power supply. I can get an eight to teen foot screen using this bulb. Add a medium to large stereo system in the front and back of the room for the perfect theater experience. Invite your friends and family to the "Movies". Pop popcorn, have some drinks and turn on one of your favorites.
 I chose this image to show how light and dark areas will show up with the projector mod. This image displays very well on screen, however is VERY hard to take with a digital camera.
If you like my projector mod please Digg it!
Please note: This project has been added to please check out my Halogen WORK LIGHT Projector Mod
Wiring some more
Then youll need to use a little bit of thin wire to hold the bulb exactly where you want it to get the best projection. And you'll also need to run the projectors fan to keep the bulb cool.
 Optional: You may also want to reset the bulbs timer. The one in this projector counts down from 2000 hours, but is not necessary to operate the projector.
 Optional: You may also want to reset the bulbs timer. The one in this projector counts down from 2000 hours, but is not necessary to operate the projector.
Wiring the bulb
After the bulb is extracted you need to use butt splice connectors to tightly connect both the standard and high beams together to a +12V and ground lead to be strung out the side of the projector. There will be three or four leads. Look through the glass to find which lead goes where, and activate both the regular and high beams at the same time. I used automotive connectors so I can change the bulb out if needed. To hook the PC power supply to the bulb connect a +12v lead (yellow) and a ground wire (black) to the automotive bulbs contacts.
 You will need to crimp, solder or use wire nuts because your dealing with a good amount of power. To power the bulb you either need a big 8+ amp 12v supply or use an old PC power supply. If your using a PC supply you will need to manually activate it or hot wire it.
Here's a how to : http://www.techwarelabs.com/guides/misc_mod/psumod/
Extracting the bulb!
Next you'll mostly likely have to remove the base that holds the actual glass bulb. This is the most difficult part of the mod. You'll want to wear gloves and use lots of patience when extracting the bulb from the base. I broke the prongs out of the bottom of the base then used side cutters to free the bulb from the metal holder toward the top of the base. After it was loose I worked the bulbs thick leads back and forth until I was able to cut them at a reasonable distance. You don't want to break off the power leads to the bulb or you will ruin the bulb.


Finding a bulb

First begin by estimating the amount of space allotted for the normal bulb. If you have one that takes a bulb cartage youll have to find a bulb that fits into the cartage if possible. The standard size of the auto bulb fits mine well. Now you know about what size bulb you can buy. (I recommend a 9004 XV from Sylvania, others may work as well. Youll want at least a total of 110 Watts).
This mod "should" work on all projectors that can fit a high power headlight bulb in the area that would normally hold the original projector lamp. Most all newer projectors use a lamp cartridge that houses both the bulb and the non conductive reflector. You would have to find a suitable bulb and insert it into the cartridge. Most automotive bulbs are of the size I used in the instructable. Remember you need A LOT of light output, so a wattage of 110+ at 12v is recommended. (Add the high and low wattage values).The nice thing about my projector, the MVP800 is that is has no cartridge. It uses a glass bulb shaped like a rod with a ball in the center. The reflectors and lens are all part of the projector. (The round reflector closes around the bulb witch has been removed from the projector in this picture)

This mod "should" work on all projectors that can fit a high power headlight bulb in the area that would normally hold the original projector lamp. Most all newer projectors use a lamp cartridge that houses both the bulb and the non conductive reflector. You would have to find a suitable bulb and insert it into the cartridge. Most automotive bulbs are of the size I used in the instructable. Remember you need A LOT of light output, so a wattage of 110+ at 12v is recommended. (Add the high and low wattage values).The nice thing about my projector, the MVP800 is that is has no cartridge. It uses a glass bulb shaped like a rod with a ball in the center. The reflectors and lens are all part of the projector. (The round reflector closes around the bulb witch has been removed from the projector in this picture)

Gathering parts and supplies
For this mod you will need the head light ($7), power supply (old PC supplies work well $5), and some good gauge wire ($2), thin bare craft wire ($1), pliers and other tools. And oh yeah, one projector with a burned out bulb (E-bay).


Tuesday, March 16, 2010
Automotive Headlight Projector Mod V1.2
Modding your projector on the cheap!
With the simple use of a 12V Automotive headlight and a power supply.
The OEM replacement bulb for my projector cost ~$300! More than what I paid for the projector it self. And my power supply that powered the original bulb was almost toast. Using this guide you can use an automotive head light bulb for about $15 dollars.
If you like this mod please Digg It!
Please note: This project has been modified please check out my Halogen WORK LIGHT Projector Mod
WARNING : This mod involves modification of a power supply, projector, and a high power bulb if you are not comfortable with moding on this level, DO NOT attempt this mod. The writer is not responsible for any injuries resulting from these instructions.
Monday, March 15, 2010
The BluRay Player LIVES!
I have repaired the Blu-Ray Player!!! : D
It turns out that the groaning sound I spoke of earlier was the culprit. A small metal clip was touching the white plastic disc. (It holds the DVD/Blu-Ray down to the drive motor with a magnet. I don't know if there's a name for it so ill call it the white plastic disc)
 I placed a post it note on top of the drive to keep the DVD/Blu-Ray lasers out of my face while I was working on the drive. I know this probably isn't safe enough so, DO NOT try this at home. Use proper safety precautions when working on optical drives and lasers.
I bent the clip out of the way, and it still touched the plastic disc and was continuing to slowly turn the disc into white power.
Not seeing any useful purpose for this metal clip I removed it from the drive.
I popped a DVD in and the drive ran perfectly.
After a little reassembly some Windex and elbow grease it looked like a brand new player.
Now to get some Free Blu-Ray movies..
Here's a picture of the clip. If any one knows why this is here please tell, I really couldn't figure how this fits in without getting in the way.

It turns out that the groaning sound I spoke of earlier was the culprit. A small metal clip was touching the white plastic disc. (It holds the DVD/Blu-Ray down to the drive motor with a magnet. I don't know if there's a name for it so ill call it the white plastic disc)
 I placed a post it note on top of the drive to keep the DVD/Blu-Ray lasers out of my face while I was working on the drive. I know this probably isn't safe enough so, DO NOT try this at home. Use proper safety precautions when working on optical drives and lasers.
I bent the clip out of the way, and it still touched the plastic disc and was continuing to slowly turn the disc into white power.
Not seeing any useful purpose for this metal clip I removed it from the
 drive.
I popped a DVD in and the drive ran perfectly.
After a little reassembly some Windex and elbow grease it looked like a brand new player.
Now to get some Free Blu-Ray movies..
Here's a picture of the clip. If any one knows why this is here please tell, I really couldn't figure how this fits in without getting in the way.

Sunday, March 14, 2010
FREE BluRay Player
 So I'm at my favorite electronics store in Fairbanks, the waste transfer station. And what do I find? A BluRay Player. Awesome! Its a SHARP BD-HP21 to be eaxct.
So far my opinion of BluRay has been "Its nice, a solid Hi-Def format with codec issues that Ill buy when the average price is equal to that of DVD. (I really see no reason to buy BluRays when I can get 2 DVDs for the same price.) However, at this store, the price is all ways right, they had the right power cord and I even like the color! It will look great with my FREE Dolby Surround receiver. ; D
After getting it home there was a something ratteling around in the case. so I popped the top off the thing, to have a look. Aside from some dust there were no foreign objects. So the rattling must be coming from the drive unit it self. And it sounded like pocket change. NOOoo Not again I have heard this sound before, Its the sound of a toddler that puts pocket change into a CD rom drive.
The Drive unit is a 5 1/4 just like you would find in a computer. It
 even uses Molex for power and a SATA connection for data. After carefully prying the case off the drive, I found exactly what I thought it sounded like, a nickel and a quarter. In the drive was a Netflix Play station instant streaming disc. I have no idea why this would be in the drive. And on the disc and tray are residue of grape jelly, Yummy!
After cleaning off the jelly, removing the nickel and quarter, the drive tray opens and closes with ease. I connected the device to my A/V switcher and fired it up! It was very exciting to watch the BluRay post and the splash screen come up. I popped one of my least favorite movies, the new Jounery to the center of the earth. (Wow, Ill talk about things that kill me a little inside later. And if you havent seen this movie please don't)
Well the drive spun up with a grown and message popped up on the screen saying "Reading Disc". Then it just sits there trying to read for several minutes, ejects the disc and says Read Error. So thats where I am with my first BluRay experience. And Im not overly disappointed. If you have any advice on what steps I could take next, I would be very happy to hear from you. Im planning on redismanteling the drive and cleaning the laser lense and other troubleshooting. Ill keep you all informed as I go along.
The Blu-Ray player is working please see the next post here!

Monday, March 8, 2010
Cleaning & Testing Used Computers In 3 easy steps
The process in witch I test and refurbish PCs has taken my a very long time and some trial & error to get everything right. I have what I now believe to be the best method possible. And even though this is not an exciting subject I am going to share the entire process with you.
I will start my explanation by describing the best possible scenario and work from there
Backed up any necessary files or image the hard disk drive if possible before starting this guide.
Step One: House Cleaning

I open the PC case check for any water, snow, bugs, rodents or dampness of any kind. If any moisture is found I wipe up any water & attempt to clean any dust & dirt out of the case and let it dry for at least 24 hours. If the computer was submerged other action will be necessary I will discuss this later.
Having a dry system, I clean out any dust from all fans and power supply. And remove the CPU heat sink completely. Using a 2 inch paint brush I carefully clean dust from the CPU sink and any chip-set & video card sinks if necessary. Removing dust from a system can resolve many issues.

Now is a great time to check the heat sink compound between the heat sink and the Processor. If it looks dry and cracked like chalk, has brown edges, or formed a dry ring with recessed areas it must be removed and replaced. Apply a small amount new compound I prefer Arctic Silver. Remember its not like icing a cake just a small drop will cover the chip.
Carefully reapply the cleaned heat sinks and fans and you ready for Step 2:
 Step 2: Starting the system or "FIRE IN THE HOLE!!!".
Check that everything is reassembled. All fans connected and your heat sinks firmly reattached and seated on their chips. your now ready to start the system. Power on the system and immediately enter the BIOS (Press the F2, F10, Delete or what ever the POST screen tells you to press to "Enter Setup" or "Boot Menu"). If you missed the screen just hold the power button down or press the reset button. Check your "PC Health Status" in the BIOS. This screen will show you voltage outputs, fan speeds & temperatures. In sure that your are out putting 12v, 5, and 3.3v. Check that your fans are turning at a good RPM. What is a "good RPM"? The RPM that cools your system to under 90F and the processor to under or around 120F (European users can use Google to convert I live in the US : )
Now check to see that all fans are spinning at there proper speed and you don't hear any grinding or vibrations from any of the computers fans, power supply, hard drive or CD Rom. Remember that it may take several hours or even days to hear a dying component. Time for Step 3 its getting serious.
Step 3: Active System testing or Getting SERIOUS!
 Now that things are running well its time to test the system. I first test the RAM. I employ Memtest 86 +. Its fast and easy. You can download it from there site and burn it onto a CD-R. All you do to start the program is pop the disc in your optical drive and reboot. If the program doesn't start when you reboot the system enter the BIOS and tell your BIOS to boot from the CD Rom device first before the HDD or use the system boot menu. Just boot the system and you should see Memtest 86 screen. Make sure the test is running for about a minute and walk away. The test will take anywhere from 20 minutes to a couple hours to complete depending on the amount of ram you have and the speed of your ram.
Now t hat your rams tested test your HDD. I use a little utility called PC Check. Its the most versital PC Testing Utility that I know of. You can also use SpinRite 6 witch is more accurate however much slower. PC Check is a bootable utility just like Memtest. In the menu select Advanced Diagnostics tests. Then Hard Disks. I like to use the SMART Immediate Test. This takes less than 30s. This will tell you if the drive has had any previous command failures and may be failing. After that I fire up the Non-Destructive Write Test by default the test will take 10 minutes. You can change the settings in the menues to force the test to take as long as you like or test the entire drive. A bad drive will have usually failures within the first 10 minutes. If you find any failures test the drive longer and then I recommend replacing the drive and retesting.
ITS OVER!
Well we have cleaned dust, checked fans & Heat sinks, Tested RAM and Hard Disk Drives. If your system has made it this far its in good shape and ready for an operating system to be installed if your rebuilding completely. Of course you backed up any nessary files before started working right.
Later on I will write more detailed how to s for the more difficult problems that you may encounter while preforming testing.
See the Next Entry for OS Installation and Slip Stream Sliding Madness.
Some image by http://www.pachd.com/
I will start my explanation by describing the best possible scenario and work from there
Backed up any necessary files or image the hard disk drive if possible before starting this guide.
Step One: House Cleaning

I open the PC case check for any water, snow, bugs, rodents or dampness of any kind. If any moisture is found I wipe up any water & attempt to clean any dust & dirt out of the case and let it dry for at least 24 hours. If the computer was submerged other action will be necessary I will discuss this later.
Having a dry system, I clean out any dust from all fans and power supply. And remove the CPU heat sink completely. Using a 2 inch paint brush I carefully clean dust from the CPU sink and any chip-set & video card sinks if necessary. Removing dust from a system can resolve many issues.

Now is a great time to check the heat sink compound between the heat sink and the Processor. If it looks dry and cracked like chalk, has brown edges, or formed a dry ring with recessed areas it must be removed and replaced. Apply a small amount new compound I prefer Arctic Silver. Remember its not like icing a cake just a small drop will cover the chip.
Carefully reapply the cleaned heat sinks and fans and you ready for Step 2:
 Step 2: Starting the system or "FIRE IN THE HOLE!!!".
 Check that everything is reassembled. All fans connected and your heat sinks firmly reattached and seated on their chips. your now ready to start the system. Power on the system and immediately enter the BIOS (Press the F2, F10, Delete or what ever the POST screen tells you to press to "Enter Setup" or "Boot Menu"). If you missed the screen just hold the power button down or press the reset button. Check your "PC Health Status" in the BIOS. This screen will show you voltage outputs, fan speeds & temperatures. In sure that your are out putting 12v, 5, and 3.3v. Check that your fans are turning at a good RPM. What is a "good RPM"? The RPM that cools your system to under 90F and the processor to under or around 120F (European users can use Google to convert I live in the US : )
Now check to see that all fans are spinning at there proper speed and you don't hear any grinding or vibrations from any of the computers fans, power supply, hard drive or CD Rom. Remember that it may take several hours or even days to hear a dying component. Time for Step 3 its getting serious.
Step 3: Active System testing or Getting SERIOUS!
 Now that things are running well its time to test the system. I first test the RAM. I employ Memtest 86 +. Its fast and easy. You can download it from there site and burn it onto a CD-R. All you do to start the program is pop the disc in your optical drive and reboot. If the program doesn't start when you reboot the system enter the BIOS and tell your BIOS to boot from the CD Rom device first before the HDD or use the system boot menu. Just boot the system and you should see Memtest 86 screen. Make sure the test is running for about a minute and walk away. The test will take anywhere from 20 minutes to a couple hours to complete depending on the amount of ram you have and the speed of your ram.
 hat your rams tested test your HDD. I use a little utility called PC Check. Its the most versital PC Testing Utility that I know of. You can also use SpinRite 6 witch is more accurate however much slower. PC Check is a bootable utility just like Memtest. In the menu select Advanced Diagnostics tests. Then Hard Disks. I like to use the SMART Immediate Test. This takes less than 30s. This will tell you if the drive has had any previous command failures and may be failing. After that I fire up the Non-Destructive Write Test by default the test will take 10 minutes. You can change the settings in the menues to force the test to take as long as you like or test the entire drive. A bad drive will have usually failures within the first 10 minutes. If you find any failures test the drive longer and then I recommend replacing the drive and retesting.
ITS OVER!
Well we have cleaned dust, checked fans & Heat sinks, Tested RAM and Hard Disk Drives. If your system has made it this far its in good shape and ready for an operating system to be installed if your rebuilding completely. Of course you backed up any nessary files before started working right.
Later on I will write more detailed how to s for the more difficult problems that you may encounter while preforming testing.
See the Next Entry for OS Installation and Slip Stream Sliding Madness.
Some image by http://www.pachd.com/
Tuesday, March 2, 2010
Acquiring a used / dead system

A quick over view for finding PCs for cheap or for FREEEE!!!
Friends and Family with older systems are the easiest way to get a system. If you are like me then you help people setup new computers they have bought and help them migrate their files over to the new computer. Once this is done don't be afraid to ask them what they are going to do with the old one. Most people are afraid that there data will get stolen and end up putting there old computer in the closet or garage. It sits for 4 or 5 years and is tossed out.
Ex-plane that the hard drive MUST be formatted or erased, in order to prevent identity theft. You should ,with their permission, back everything up to there new computer & CD/DVD if possible. Once they are satisfied they have all of there data (E-mail, pictures, i Tunes, MP3s, favorites, documents, any program information or other files) You can then proceed to erase the hard disk. If they are wanting to sell the system, I would consider paying any where between 30-150 dollars all depending on internal components, monitor, condition of case.

Dumps / Reuse Areas
I have gotten some of my best systems at the dump! Yes! I know that I am a dumpster diver. If you find a computer at the dump the price is always right. and even a stripped system can have many usable parts. If your dump has a reuse area for unwanted useful things its a great resource for people that tinker and are thrifty. So far I have found 30 or so usable systems at places like this. Even if your local dump doesn't have an area you can always look into your dumpster in your neighbor hood or at work. You wont find a computer every week however over the months you will find a desktop or laptop. I guarantee it. Keep in mind that some dumpsters will be more likely to have computers. e.g in neighborhoods or at colleges/universities after the semester is over.
Online Surplus Retailers
I have never tried using one of these sites, however I have seen some good deals and the parts DO come with a small warranty" Usually you will find prices to be higher than at thrift stores but the parts are new or refurbished. Also you can order whole systems including monitor and have them setup everything for you. Pricewatch has links to many of these sites. http://www.pricewatch.com And one that I found to be very attractive is http://www.pcpartsohio.com/

Second Hand / Pawn / thrift Shops / Used Computer stores
These places are topically not a good place to get a used system. most of the time the prices are to high and the system has something wrong with it. however if the system is in non-working condition yet still has some good components you may get a decent deal.
No Matter where you get you PC make sure you know what your buying if your going to pay for it.
Take a look at the next step to know what to look for and how to test parts if they run.
Monday, March 1, 2010
RETROFITTING and REBUILDING PCs
 A guide to recycling & rebuilding used computers for use in your home or office.
(Steel cutting NOT required)
With all the PCs from 2001 and later, showing up dead or just unwanted, a slightly tech savy person can retrofit one of these used machines for a plethora of uses.
Wither you just want a 2nd PC for your house or need more gaming power, want to build a media center, or just a music or file server a used/dead computer can give you many or ALL the resources you need.
In this guide I will give you an idea of what you'll need to get and how to start putting together systems for a multitude of uses.
Wednesday, February 24, 2010
The pleasures of getting things for really cheap

So, you ask, how do I manage to live in this so called " Digital Age"? For starters, I almost never pay for anything full price. Especially with the economic times we are living in, we all must do what we must in order to be able to keep up with the rapid technological demands and stay relevant in a society that will, I'm afraid, one day no longer see people as relevant, but the machines that power our society on their way to becoming omnipresent.
However, I see no need to despair. There is hope! I cannot tell you of the countless times I have looked for a bargain and found one. True, some of these incidents have almost seemed fortuitous or serendipitous, but they are there if you look hard enough.
What am I talking about, you say? Well, for one, there are many ways to come by cheap stuff, and if you are savvy enough, to be able to use them or fix them and resell them for a much greater profit. This is something I enjoy doing in my off time. I like to go to thrift stores, transfer sites ( a place at a community dump site where still usable goods may be left for others to use) or look on sites that list used items for cheap (craiglists for example). These places have a bounty of stored treasure. With a little cleaning and know how, you may be able to score some real finds.
I have had the pleasure of finding very serviceable computers with their windows licenses still on them, and being able to repair them with spare parts on hand or using what is left of them to service other computers. I have in turn sold many such computers to others and made quite a tidy profit. I have accessed a niche in society, one that says that all computers must be expensive and brand new. Not so. I have never had anyone complain about my computers. I am very proud of that!
Also, I have found a bread machine ,many books, sound systems that now supply the surround sound for my home theater, gaming accessories, TV's (tubes), computer accessories, and many a tossed console game. Similarily, at the thrift stores and such, I have snagged many well used items and been pleasantly surprised at their workability. There is no shame in any of this. Why spend so much money on the peripheral things ( keyboards, mice etc) when you can use that money for the important things, mainly those that cannot and should not be bought in a used goods store? For instance, high value items like HDTV, projectors, things that will have had a problem and not likely to be serviced by you.
Ending this post, I mean to say that with a little luck and persistence, and maybe some dumpster diving, you really can find some treasure amongst another man's trash.
Monday, February 22, 2010
First!

This is the first POST! Yahoo!
I plan to talk about many topics that reflect the way I live my life in the digital age. As I have never had great amounts of cash to fund my projects, I have had to come up with frugal ways to complete my ideas and acquire my equipment.
My friends always joke and jeer ,however they always have a great time whether its watching the 92 inch theater, jamming on the quadraphonic surround sound system, or playing games on a computer previously destined for the dumpster.
This is how I create the extraordinary, out of the "junk" that society has thrown to the wayside.
Subscribe to:
Posts (Atom)
